|
Controlling a system is essential whenever it needs to full fill a relevant task as such. It's depending on the designer of the product. PID is one of the most common and perfect systems in control systems. PID gives us a rough idea about what it stands for. P for proportional, I for integral and D for derivative as such. Let me explain the idea of what I've absorbed from working with those basic things. What I wanted to build is a line following a smart car that used two proximity sensors to identify the white line on a black surface. I was trying with several controlling methods implemented on my own, They worked properly as well but my robot was too slow. After that I got to search for a controlling method via the internet it was found the PID controlling system for me. PID is a close loop feedback system which was full filled my requirements with a nice speedy robot. I thought that it would be better to share with what I've grabbed from them with you as well. You will find lost of diagrams its basic theories rather than getting deep understanding. So this is it. First of all, this will be based on Arduino but the concept can be used in whatever your using platform. When you are using PID there should be a set point. What we are going to do is our system control at that set point. There would be three conditioned, 1. Under-damped - This kind of system is oscillating over a long period so it's not good for systems with rapid response. 2. Over-damped - There won't be any oscillation but this needs a longer time to get to the set point. 3. Critically-damped - This is what we have to use it will be set with less amount of time and it gives us the perfect outcome of the system. Output = Kp*(error) + Ki*(cumerror) + Kd*(rateerror)Kp - Proportional constant Ki - Integral constant Kd - Derivative constant Copy Of the Arduino Code: 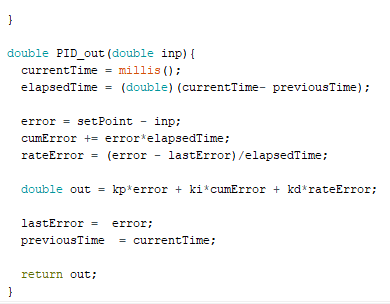
0 Comments
I’m gonna tell you how to set up your Raspberry pi using windows personal computer. The best thing about this story is you don’t need an external monitor. So let’s start. Components 1. Raspberry pi 2. MicroSD card 3. SD card reader Step 1 Initially we have to have a Raspbian bootable device. What we are going to do here is make our microSD as a bootable device. First we need to download Raspbian image from the official website [www.raspberrypi.org/] .Then extract it into your computer. We need an etcher to flash the image into our SD card. You can you any tool you prefer to do this [https://etcher.io/] . Connect your microSD card by using the SD card reader to your machine. Then flash the image into it. At last Open the SD card from your file explorer the drive will be labelled ‘boot’. SSH access is disabled by default. So make an text file named ‘ssh’ inside the boot folder. Now you are done the first step. Step 2 The next step is connecting to your network. Before that we need to configure our device. Download and install notepad++ [notepad-plus-plus.org/download]. Then open notepad++ and open a new file. Then navigate to edit > EOL Conversion and Make sure Unix (LF) is selected. It should appear disabled if it is. Paste the following code into it. country=IEctrl_interface=DIR=/var/run/wpa_supplicant GROUP=netdevupdate_config=1network={scan_ssid=1ssid=”Your-SSID”psk=”Your-PSK”key_mgmt=WPA-PSK} Replace Your-SSID and Your-PSK according to your router. At last, Select File > Save as, navigate to your boot drive and call the file wpa_supplicant.conf. You're almost finished with the setup. Step 3 In this step make sure your computer is connected to the same network as your Raspberry Pi. Log into your router and find the ‘IP address’ of your Raspberry pi. There are few other ways to find the IP address after connecting the Pi to your network. Your free to chose any. Finally what you have to do is install putty [www.chiark.greenend.org.uk/~sgtatham/putty/latest.html] to communicate with your board via SSH. Fill the fields and make sure to replace IP address field accordingly. 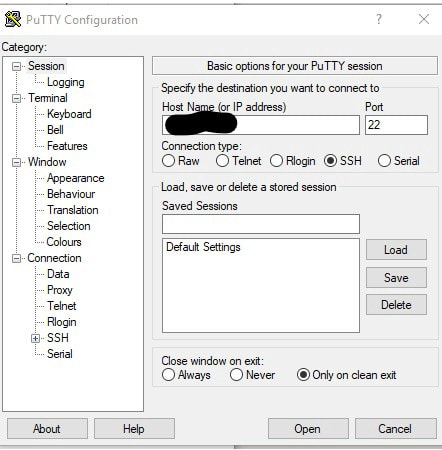 You can configure the board by running sudo raspi-config.Now you have the IP address of your device hence you can use any interface you want VNC Viewer can also be used to get and GUI.
|
AuthorI'm Asiri. Electronic engineering Student. Archives
April 2023
Categories |
 RSS Feed
